Eldrid Heroes
This is a compilation of all the Eldrid Heroes in Battleborn. Check the changelog every so often to see if a guide for your favorite character has been added!
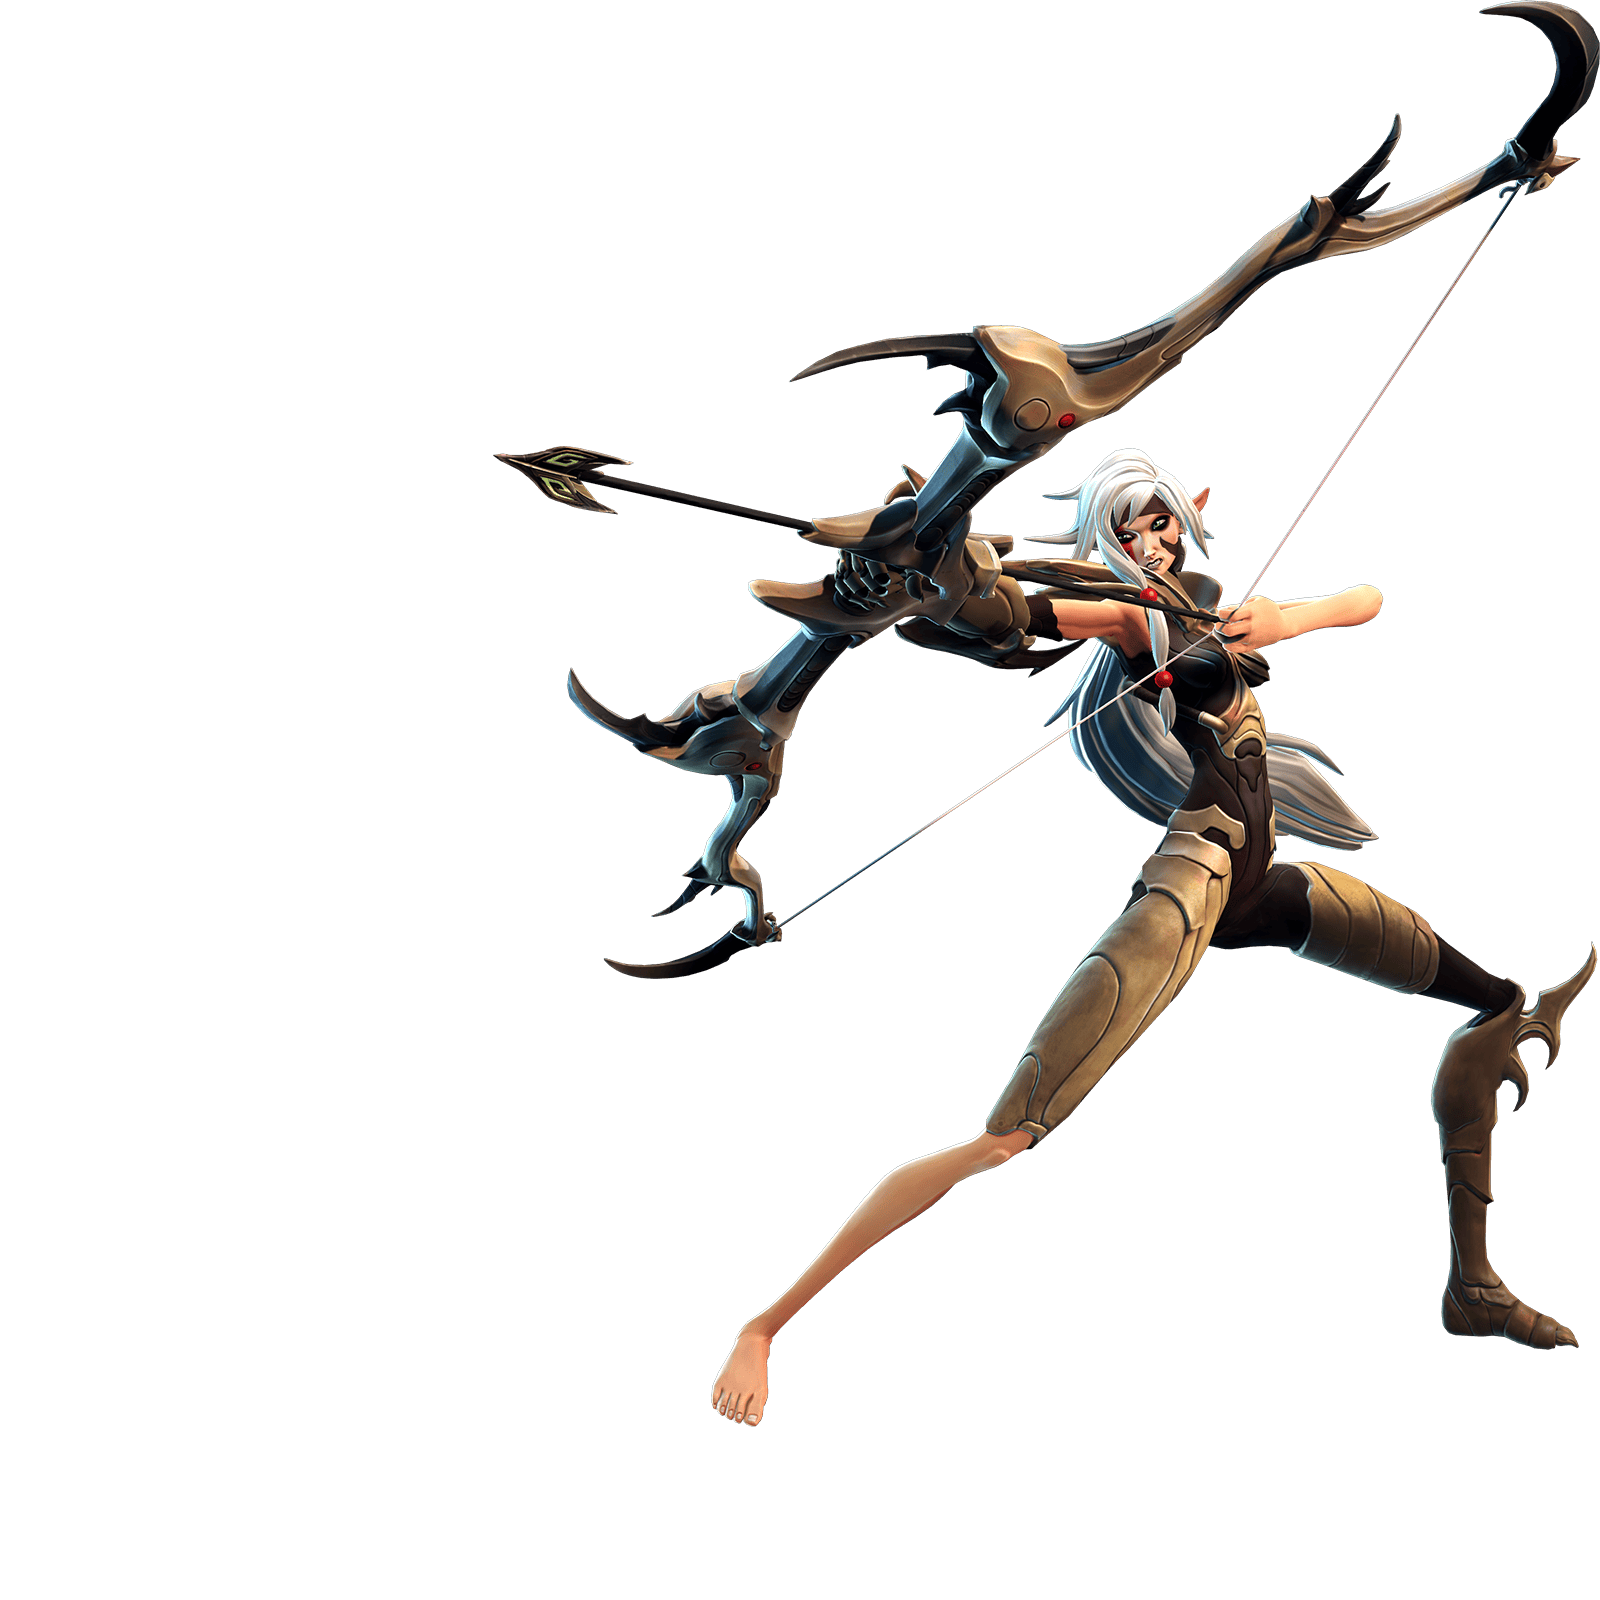
Thorn (Attacker)
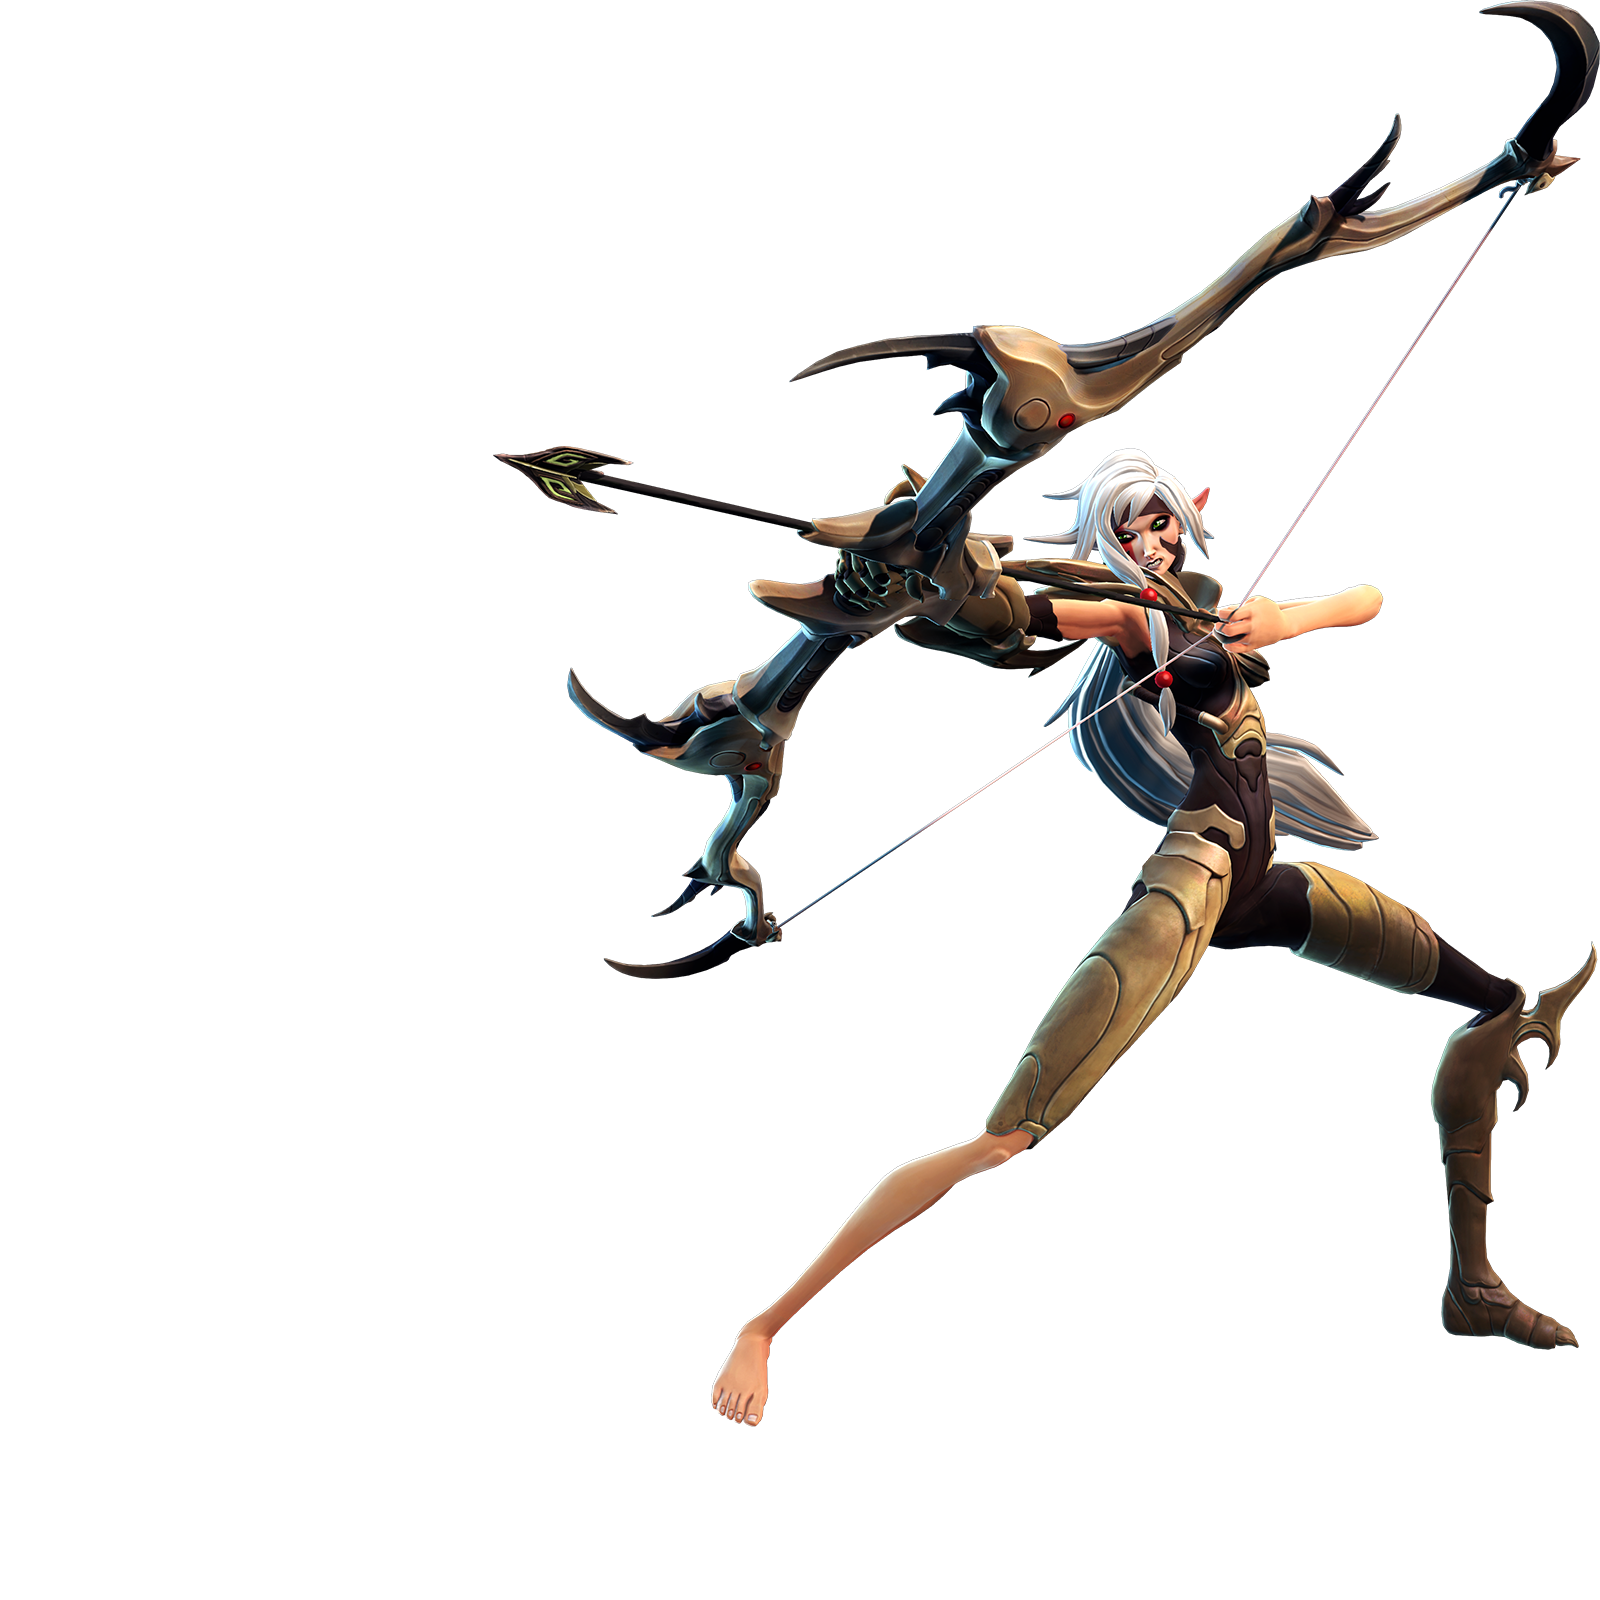
Biography: Teshka Elessamorn—nicknamed "Thorn" for her short temper—was the last child born to her homeworld before the Varelsi claimed it. Armed with her longbow, Kreshek, she now ranges the wilds of Ekkunar, fueled by her own boundless fury. Full information on Thorn's abilities, weapons, and talents can be found in-game or here.
How to Play Thorn:
Thorn is an archer that excels at raining death on her enemies from a distance, while also clearing out minions, recruiting mercenaries, and shutting down parts of the map with her Blight ability.
As always, aim for the heads. Especially with Thorn's cursed arrows, critical strikes are devastating when you land them. In fact, just laying down Blight on Thrall mercenaries and firing charged arrows in their heads will net you a free merc camp in twenty seconds.
One advantage Thorn has is her lack of a shield. While overall it does harm her, every enemy is going to view you as an easy target; lack of a shield is weakness in Battleborn. So when an enemy overextends to try and kill you, just throw down a Blight and Wrath of the Nature their face. This'll turn the tables nearly instantly, leaving the enemy in perfect position to be shot down like innovation in Hollywood.
Since Thorn's shots are arrows and not bullets, you'll need to aim where your target is moving, not where they are. While this can make smart enemies able to dodge your arrows, more often than not, your shooting at an empty space that an enemy is moving towards is a complete surprise. Throwing the enemy team off should be a priority, no matter the character you're playing.
Blight can be used, not only to harass enemies and clear minion waves, but also as a way of saving an ally in danger. When Shayne and Aurox or Rath is on your teammate's trail like a facehugger in Half Life, throw down Blight, again, not where your ally is, but where they're running to. The enemy has the option to either disengage, or take significant damage and be open to being surrounded by enemies, while low health.
Remember that your melee can hit enemies away from you, so if you ever get in trouble, don't shy away from using it. But in general, stay in the back of fights, and don't chase enemies when just shooting them in the back is an easier option. Thorn (I'm so sorry for this) can be a thorn in the enemy team's side if you play her correctly.
Helixes:
The following is a list of Helixes that I played with. This build isn't the only way to play Thorn, for sure, but it gives good damage output and helps her stay alive, despite her lack of a shield. This may change as I unlock mutations.
1. Piercing Volley (Volley's arrows can go through multiple targets). While Swampfoot is useful as a technical ability, shooting a Piercing Volley into an enemy team is a great way to knock off a bit of their health before a team fight. Also, paired with Archer's Boon at level 9, Piercing Volley gives great sustain to a character that desperately needs it.
2. Cursed Earth (While touching Blight's field, all of your arrows are cursed). When an enemy is Cursed, they take 25% extra damage from Skills and charged arrows. This allows you to fire off a quick shot to Curse an enemy, then Volley them and hit them with a charged arrow. The sudden burst of damage takes most people by surprise.
3. Draw Strength (Arrows penetrate multiple targets). Like Piercing Volley, this Helix allows you to really harass an enemy team with a single shot, especially if they're bunch up. Or if you just don't know what's happening when you're surrounded by explosions, just fire off towards the enemy team, and watch the kills rack up.
4. Kreshek's Judgment (Volley's arrows curse targets). Not an amazing Helix, but still nice if you know how to aim your shots. Getting an enemy cursed with Volley allows you to butter them up for significantly extra damage with Blight.
5. Hextension (Curse lasts 4 seconds longer, and the damage bonus is increased by 10%). This Helix gives you a larger window of opportunity to hit an enemy with a Curse damage boost, and it makes all of your Curse hits deal more damage. All-around, very useful. If you're not so good at aiming your arrows (which, if so, why play Thorn?), going with the alternate Helix is understandable.
6. Brutal Blight (Blight deals 15% extra damage). Most enemies just wander into Blight, no realizing that any damage they can do to you in it is just gonna be matched by the ability. This just punishes enemies even more for wandering in to your domain.
7. Eagle Eye (Increases your accuracy by 50%). No matter how good you are at aiming, this is a must-have. Headshots are easier, and overall, just hitting your targets isn't a pain anymore. Incredibly useful.
8. Enduring Blight (Blight lasts 6 seconds longer). Not only do you get map control for even longer, this lets Blight stick around and deal even more damage to anyone caught in its radius. Crazy good Helix.
9. Archer's Boon (Volley heals you for 30% of the damage dealt). Thorn is a character in desperate need of sustain, and Archer's Boon supplies it. Enemies don't expect you to recover a large chunk of health out of nowhere when you fire a Volley into a group of minions with Piercing Volley and Archer's Boon. This is a must-have, unless you have a good healer on your team. Then it's your decision.
10. Earthrender (Wrath of the Wild leaves behind a field of Blight). While the other Helix makes your Ultimate unpredictable (and useless), this Helix makes the initial explosion also leave behind a damage-over-time field that helps you curse your enemies quicker. This makes your Ultimate something to be even more feared than it already is.
Loadouts:
In my opinion, Loadouts for Thorn should prioritize Health, Skill Damage, and Cooldown Reduction. Without a shield, Thorn is a squishy target, so extra health keeps you in the fight longer. Meanwhile, Skill Damage and Cooldown Reduction make your Blight and Volley a force to be reckoned with. The extra skill damage is especially nice for keeping Wrath of the Wild as one of the most terrifying bursts of damage available.
How to Unlock Thorn:
Starter Character.
* * * * * *
Miko (Supporter)
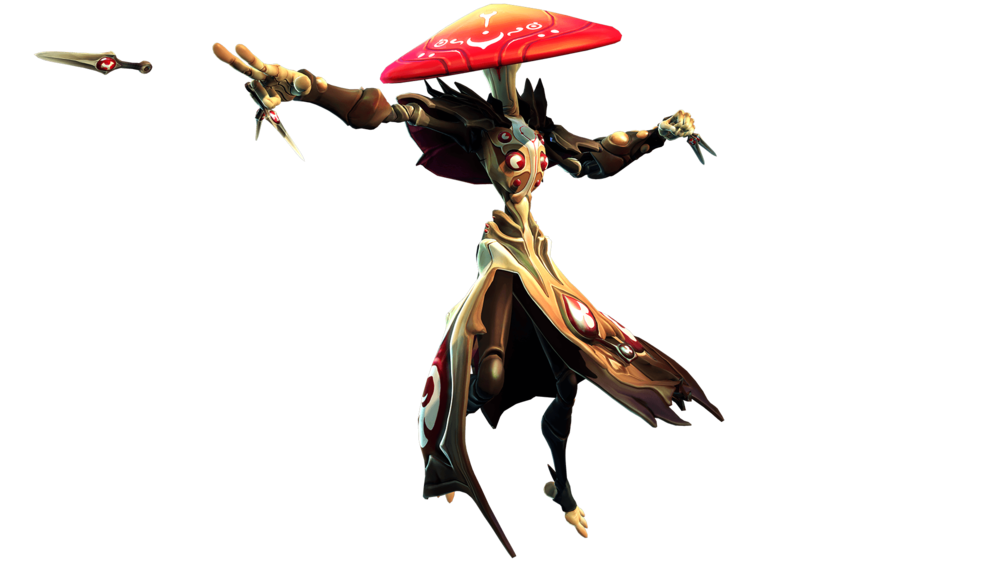
Biography: The last surviving bud of a planet-spanning fungal colony, the otherworldly Miko is regarded as a capable "combat botanist", healing and protecting its allies while hurling poison-tipped kunai at pretty much everything else. Full information on Miko's abilities, weapons, and talents can be found in-game or here.
How to Play Miko:
There's a reason you'll see a Miko in nearly every game right now. Miko is an incredibly potent healer, turning the tides of pretty much every fight its involved in.
The #1 thing to remember is that you're a healer. It sounds obvious to most, but there's always someone who'll see "poison-tipped kunai" and completely forget their role as a support. As a healer, you need to be breathing down your team's back the entire match. Take upon the role of a clingy mother whose youngest child will turn eighteen the next day. I.e, don't let your team out of your sight.
Keep in mind the very brief, but significant, delay in your pressing the alternate attack button, and the actual presence of your healing beam. It seems minimal, and it is, but it can make a difference if you don't use it in time. Miko can heal anyone out of (nearly) anything, but you'll need to actually be healing for it to work. The presence of a Miko, sadly, doesn't equate to heals.
Note that your Biosynthesis, while healing you, also increases the potency of your healing beam. Significantly. So while it's a good "oh sh**" button, it's an even better button to press when you know a team mate is going to need an even bigger burst of healing than usual. Just because you're full health doesn't mean you can't use Biosynthesis for its very useful effects on your team.
There will be instances where you should definitely be attacking, but for the most part, you should be healing constantly. If, for instance, your ally Rath just dove the enemy team, killed 4 people, and the last enemy is running away, what should you do? If Rath has full health, and is in no immediate danger, healing him is a complete waste of time. So, of course, start spamming those kunai at that poor final soul. While this obviously won't be the case all the time, you know what I mean. Healing is priority, but don't forget your own damage potential.
Cloud of Spores should mostly be thrown out to help your team secure a kill. The slow (or stun, depending on your Helix choice) can help secure kills, and throw an enemy team into disarray as they stumble over themselves to avoid that giant pod of tree-hugging goodness flying at their face.
Though it should go without saying, place Fungus Among Us where it'll be easily accessible to your team, and where the enemy can't kill it without risk. Behind walls, around corners, etc. Anywhere your team doesn't have to go on a Lord of the Rings-esque journey to reach it. The heals given by the mushroom are extremely useful, and can easily keep the advantage of any fight on your team's side. Believe me, I would know — I went from no character level with Miko to level 3 in a single game because of how much I was healing. A large part of it was my buddy, the mushroom.
Just like anyone else, Miko needs shards. Shards are power. But your team needs you more than you need shards, I promise you. Go and destroy the giant floating crystals whenever a fight is over. And I mean over for certain. Destroy it, reap your shards, buff your healing power, and get back to your team's side. Your team is in serious trouble without you, especially with Eldrid characters who have absolutely no shield (you should be sympathetic to their plight, you're one of them).
So, final words. Miko is a somewhat ridiculous character that can decide the victor of a Battleborn match like a rich person decides the victors in politics. Always be healing your team, always be frustrating the enemy, and always be so mobile that even the best Marquis can't hit the gigantic target that is your bulbous mushroom head. And remember: you can sprint even while using your healing beam. So keep those weird fungus-covered feet moving.
Helixes:
These are the Helixes I think make Miko the best healer (it?) can be, helping you not only keep your allies alive, but also stay in the fight and remain such a quick target that your enemies will have a hard time killing you.
1. First Responder (While Biosynthesis is active, healing an ally with your healing beam increases your movement speed by 30%). This Helix keeps you moving so quickly that snipers like Marquis or Thorn will have a difficult time hitting you, and you'll be able to outrun any melee attackers, so long as you're healing an ally. Extremely useful, and keeps you versatile.
2. Heal Thyself (While Biosynthesis is active, healing allies with your healing beam also heals you). I'm sure some people will disagree with me on this, as the alternative directly heals your allies, but hear me out. More times than I can count, this Helix's healing has saved me from the brink of death, thus allowing me to stay in the fight longer and keep my allies alive. While, yes, Regenerative Aura heals your allies, it doesn't come close to how much more you can heal them if you don't die.
3. Evolutionary Emergence (Reduce cooldowns of all your skills by 15%). Overall, just very useful. You can activate Biosynthesis more often, and thus, benefit from its effects more often, and you can throw out more annoying and damaging spores at your enemies. (Having unlocked the Mutation Plentiful Healing, I think it's a better option. The extra 13 health per second is higher than your average Healing Power Gear item's healing increase on the beam.)
4. Your Decision. Honestly, this one can go either way. If you're good at aiming your spore, and Imean really good, then get Sporeshock. The 2 second stun essentially guarantees a kill if your team is present. Otherwise, and feel no shame for doing so, go with Trail of Spores. The slowing spores covering an entire line of the battlefield is undeniably good map control, and it makes aiming your Cloud of Spores ability take up less of your focus that you could otherwise be spending on healing an ally.
5. Pandemic (The poison dealt by your kunai spreads to other enemies). Honestly, the lifesteal from the alternate Helix is insignificant. This Helix allows you to throw a few kunai into an enemy team every now and then, and watch your poison damage spread through their ranks like smallpox before the vaccine.
6. Probiotics (Increases your healing gained from Biosynthesis by 15%). Again, this will keep you in the fight longer, allowing you to heal your team mates for a longer period of time. Miko is first and foremost a healer, so being present at teamfights is one of your most important duties.
7. Fight or Flight (Briefly increases your movement speed by 30% when taking damage). One of Miko's best Helixes. This will let you zip around a fight like a pinball, all while healing an ally through any damage leveled their way. In an odd kind of way, this punishes enemies for attacking you, as it just makes you a harder target to hit for any snipers that may be aiming at your bulbous mushroom head. This will also help you keep up with any quick-footed allies as you take heavy fire for them.
8. Biosynergy (Using your healing beam on allies reduces Biosynthesis' cooldown). This is amazingly useful. Your Biosynthesis buffs you gain from healing your allies while it's active are part of what makes Miko a strong support. Being able to gain those buffs more constantly, especially when all you have to do is your job, is awesome.
9. Spore Storm (Increases Cloud of Spores' Area of Effect by 50%). This not only makes the end destination larger, but also the trail leading to it. Overall, you get to make a gigantic slowing field that, if placed correctly, enemies will be forced to either walk through or fight in.
10. Depends. If the enemy team is primarily melee attackers, and thus will have to get near your mushroom to kill it, go with Vicious Strain. The damage dealt per second is devastating, even if just for a few moments. But dealing damage is not your concern as Miko. So typically, you should go with Barkskin, raising your Mushroom's maximum health, letting it heal you and your allies for longer, and making it more difficult for ranged enemies to pick it off with ease.
Loadouts:
Miko needs to be mobile, and needs to heal its team effectively. So, I believe a good Miko player should prioritize Healing Power, Movement Speed, and Sprint Speed. Honestly, all of these are self explanatory; more healing, and keeping yourself more mobile, therefore more difficult to aim at.
How to Unlock Miko:
Starter Character.
* * * * * *
Mellka (Attacker)

Biography: Born as a refugee, Mellka was raised and trained among an aggressive Eldrid commando group known as the Vigilant. Proficient at several combat styles, but prefers exotic weaponry such as her biologically-active Eldrid gauntlet, now permanently fused with her left hand. Full information on Mellka's abilities, weapons, and talents can be found in-game or here.
How to Play Mellka:
Venom is your friend. That's almost all that needs to be said.
The additional damage over time from your venom effect can be absolutely devastating to any enemy. This just gets worse for them when you get your level 8 Helix that gives your basic bullets Venom-applying magic. If you plan on leaving a fight to go do something, fire one bullet and throw your reload-grenade at an enemy. Venom effects mean that you can help your team even when you're not there, as long as you take just a couple of seconds to attack the enemy.
You should use your Claw Lunge sparingly, as it can easily leave you wide-open. The damage isn't enough to scare an enemy away from you, so most of the time, they'll just fight back. Once you get your level 4 Helix, you can use the ability more frequently. But if you miss, you won't jump backwards, so make sure you're still playing it safe.
Spike is a pretty versatile ability; use it as an escape, or just some more quick damage/venom/slow on an enemy. Don't waste it, as the cooldown is nothing to scoff at, but if it'll save your life or a team mate's, don't be afraid to press the button.
Because of your envenoming nature, you should constantly be firing at the enemy and throwing the venomous reload canisters at either them or their minions. Try to keep every enemy poisoned at any one time; it's annoying for whoever's getting damaged, it's annoying for their support, and it's especially not-annoying to your team mates, who have an entire team of softened-up enemies waiting for them.
Your Blade Launcher's use should be obvious; it's 3 largely-damaging projectiles. To make aiming a bit easier, slow down enemies with your Spike, and fire your blades at them from above. Or just wait for a team mate to stun them, then enjoy the immobile target. If you still miss an immobile target, you may want to rethink your choice in character.
As Mellka, you should take advantage of your venomous nature and constantly be chipping away at your enemies' health bars. They'll hate you for it, and your team probably won't notice, but if they did, they'd love you for it. Throw out your abilities when necessary, don't be afraid to show an overly-confident enemy who's boss, and get ready to kill a lot of people.
Helixes:
Considering every single Battleborn player has played Mellka in the Prologue, I'm sure everyone has their own opinions on how she should be played. This is my personal take on the poison-slinging sword-armed Eldrid.
1. Hobbling Spike (Enemies hit by Spike are slowed for 3 seconds). I prefer this Helix simply because it has an Area of Effect slow, rather than, for the most part, a single-target one.
2. Parting Gift (Spike leaves behind an AoE that gives enemies that are initially hit Venom, while dealing more damage over 5 seconds). This gives you more venom-applying methods, while also punishing any enemies that got too in your face.
3. Air Stall (Your quick melee attack propels you backwards, and deals 50% more damage). This makes your quick melee deal 50% additional damage, while giving you a little bit of escape capability. That additional damage also stacks with additional damage on enemies with venom.
4. Tactical Withdrawal (Hitting an enemy with Claw Lunge makes you jump backwards). If Mellka was melee, this Helix would be awful. But the jump to safety after hitting someone with an ability is pretty useful.
5. Adrenaline Rush (Meleeing an enemy afflicted with Venom increases your health regen by 7/second for 4 seconds). In case you needed even more reasons to make use of the massively-increased melee damage on venom-afflicted enemies… here you go!
6. Spike Burst (Increases Spike's radius, and Parting Gift's radius). Bigger AoE of venom-application and damage, just overall a useful Helix.
7. Power Spike (Increases Spike's and Parting Gift's damage by 15%). Especially in conjuction with the previous level's Helix, this guy is dangerous. Plus, the cooldown reduction on the alternate Helix is insignificant in comparison.
8. Refined Canisters (10 additional bullets in each magazine, and bullets now apply Venom). If not just for the Venom application on the bullets, this Helix is great. Now if you've even shot an enemy, your melee attacks will do much more damage to them. Plus, focusing down a target has now never been easier; your constant bullets, plus the constant stacks of venom are guaranteed to melt away anyone's health.
9. Finishing Blow (Claw Lunge does 15% bonus damage). The alternate Helix sounds better, but since you'll be thrown backwards after you hit an enemy, it's almost guaranteed to go to waste. The additional damage is a much more reliable buff.
10. All In (Blade Launcher now fires only one, 500-damage shot). It takes less time away from your auto-attacking, and it's honestly easier to aim a single blade than it is to aim 3, half a second apart each. The 500 burst damage is scary to any sane enemy.
Loadout:
When building Mellka's gear, I like to prioritize Reload Speed, Health Regeneration, and Movement Speed. The Reload Speed lets you throw out the envenomed grenades quicker, while also letting you keep on firing your gun, the Health Regeneration is important, since Mellka has no shield, and the Movement Speed keeps you mobile so that you can chase enemies down and run away when needed.
How to Unlock Mellka:
Achieve Command Rank 34 OR Complete "The Heliophage" Story Mission.
* * * * * *
Kelvin (Defender)
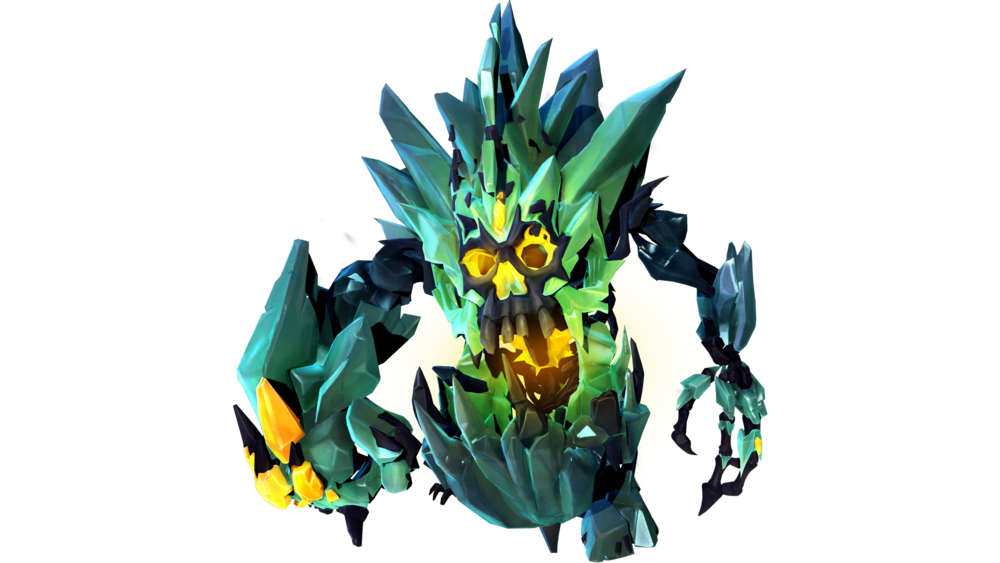
Biography: There are many strange beings in Solus, but the ice golem Kelvin is definitely one of the strangest — a single consciousness emerging from a colony of extremophilic microorganisms. Rescued by Miko, Kelvin now fights for the Eldrid to preserve what's left of the cosmos. Full information on Kelvin's abilities, weapons, and talents can be found in-game or here.
How to Play Kelvin:
Kelvin is a very odd Defender, and not just because he's actually thousands of symbiotes functioning as a single being.
As far as Defenders go, Kelvin is rather easy to kill. He has no shield unless he uses an ability, and his health pool isn't anything to gawk at. But his strengths lie in his high amount of crowd control, along with his essentially unlimited health gain from his Chomp.
So play to your strengths. Chomp increases your max health whenever it kills something, and it kills minor minions instantly. You do the math. With such a short cooldown on Chomp, you should be gobbling up minions left and right. Once you get the Helixes for it, you should also be using Chomp to keep up with enemies, and punish them if they get that 1st Helix slow on them. In a one-on-one fight, you should be using that Chomp like a basic attack.
Keep in mind how huge Kelvin is. He's an extremely easy target for any half-decent player. Don't take too many risks, because any enemy team worth their salt will punish you hugely for it. Stick with your team, provide them some nice crowd control and additional damage, and cut off enemies with Sublimate and/or its ice trail as often as you can.
You should really only use Ice Wall offensively. If enemies are chasing you or a team mate, and its stun is a last-ditch effort, then go for it. But more often than not, Ice Wall is way better at cutting enemies off, shutting down an avenue of movement for them, and stunning them in place while they die. The level 10 Helix makes Ice Wall a bit more versatile, but its main use doesn't really change.
Primarily, you should use your main attack. Only use the secondary attack on large crowds of enemies, usually minions, or once you get your level 7 Helix, use your alternate attack to keep pushing enemies back into your team. Damage- and speed-wise, though, your main attack is a better course of action.
Play Kelvin as annoyingly as possible. He excels at cutting off avenues of retreat and advance for enemies, all while soaking up a decent amount of damage for his team. Keep those fists flying, the jaws chewing, and the giant gaping ice eyes creeping.
Helixes:
When playing Kelvin, I felt that there was only one real way to build his Helixes. He's definitely an odd kind of Defender, especially because, just like all other Eldrid, he has no shield. So here's the Helixes I used whenever I played Kelvin.
1. Coldclock (Every 4th melee hit slows enemies for 1 second). Adds a nice built-in slow to your basic attacks. Especially with an attack speed Loadout, this Helix is pretty powerful.
2. Quick Bite (Damaging an enemy with Chomp increases your movement speed by 30% for 2 seconds). The other Helix gives an insignificant, slight boost to a temporary shield, while this Helix can keep you chasing down enemies for a long, long time. In my opinion, it's a no-brainer.
3. Icemaker (Replaces Sublimate's stun with an icy trail that slows enemies for 3 seconds). I've no doubt that people will heavily disagree with me on this one. After all, a stun in a high-mobility ability is pretty good. But leaving a trail behind you means you can not only slow enemies that you hit directly, but shut down any and all escape routes that are available to them. This Helix just makes the ability a lot more versatile. Plus, you'll get a new, better stun at level 5 with your Ultimate.
4. Slow Food (Chomp deals 25% more damage to slowed enemies). One of Kelvin's best Helixes. Especially since your Sublimate will now slow enemies, using this Helix effectively isn't exactly difficult. The 25% additional damage is huge.
5. Blue Ice (When your temporary shield from using abilities is active, take 30% less damage). This keeps your shield on you for a longer period of time. Not amazingly useful, but it's something.
6. Consume (Killing an enemy with Chomp reduces Sublimate's cooldown time by 5 seconds). Since your Chomp kills all basic minions in one-hit, this is incredibly useful on modes like Incursion and Meltdown. If you're playing Capture, though, I'd probably opt for the alternate Helix.
7. Icy Force (Increases push back efffect of your alternate attack). Welp, enemies don't get to run away from your team anymore. If you're on the opposite side of them, they're not going anywhere.
8. Hibernation (Increases health regen by 21/second during Sublimate). Adds a pretty nice heal to your "oh sh**, get me out of here" ability.
9. Sawtooth (Increases the max health bonus damage on Chomp by 15%). Incredibly high-damaging ability still gets more damage with this Helix, especially with the 25% boost on slowed enemies.
10. Absolute Zero (Enemies near an Ice Wall are slowed for 3 seconds). Makes your not-so-good Ultimate pretty dang good. Now you can build a wall that not only blocks an area, but also has an aura of slowing everything around it.
Loadout:
With Kelvin, I feel it's good to build his Loadout around his strengths, rather than buffing his weaknesses. I build Attack Speed to activate his level 1 Helix more frequently, Skill Damage to give his Chomp that little boost in addition to what his Helixes give it, and Movement Speed, to keep up with anyone that wants to try and run away.
How to Unlock Kelvin:
Achieve Command Rank 18 OR Win 5 matches as an Eldrid character.
* * * * * *
Boldur (Defender)
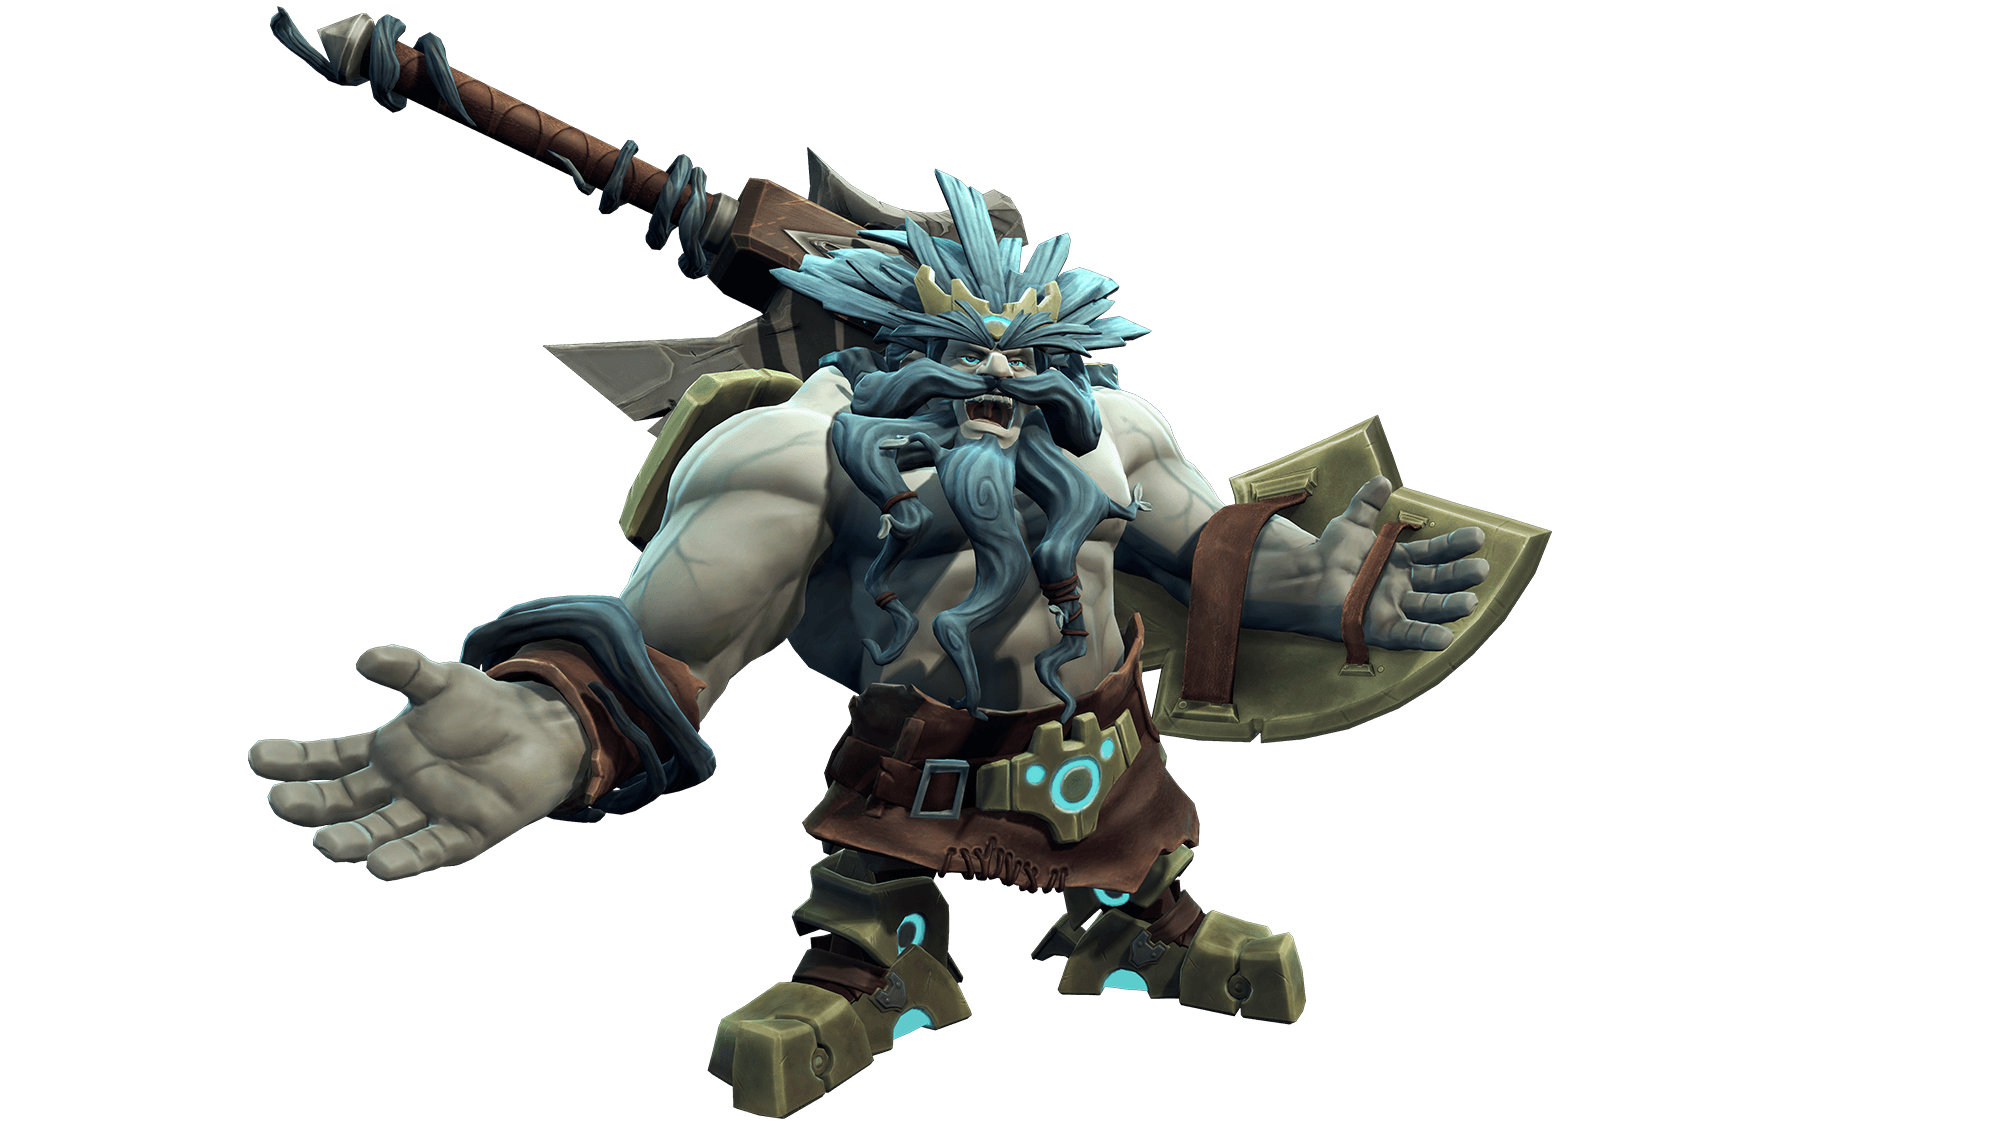
Biography: Boldur the Unbearable is a gruff, axe-wielding native of Ekkunar who has survived the last two millennia through sheer stubbornness. Tough as a gnarled root, the Ekkuni dwarf carries only a rune-forged axe and shield into battle against any foe who dares land their dropship in his front yard. Full information on Boldur's abilities, weapons, and talents can be found in-game or here.
How to Play Boldur:
More information coming soon.
How to Unlock Boldur:
Achieve Command Rank 26 OR Complete "The Experiment" Story Mission.