LLC Heroes
This is a compilation of all the LLC Heroes in Battleborn. Check the changelog every so often to see if a guide for your favorite character has been added!
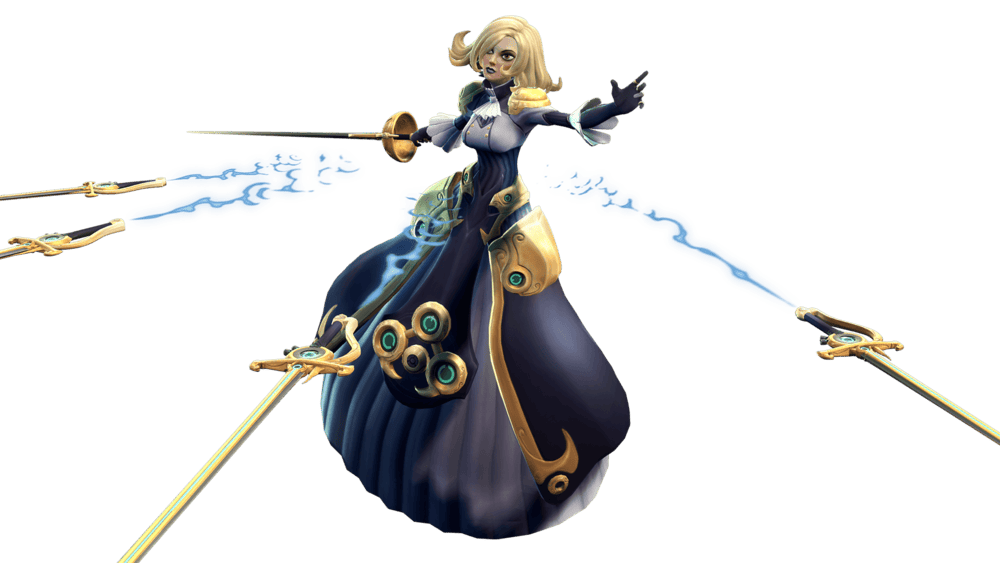
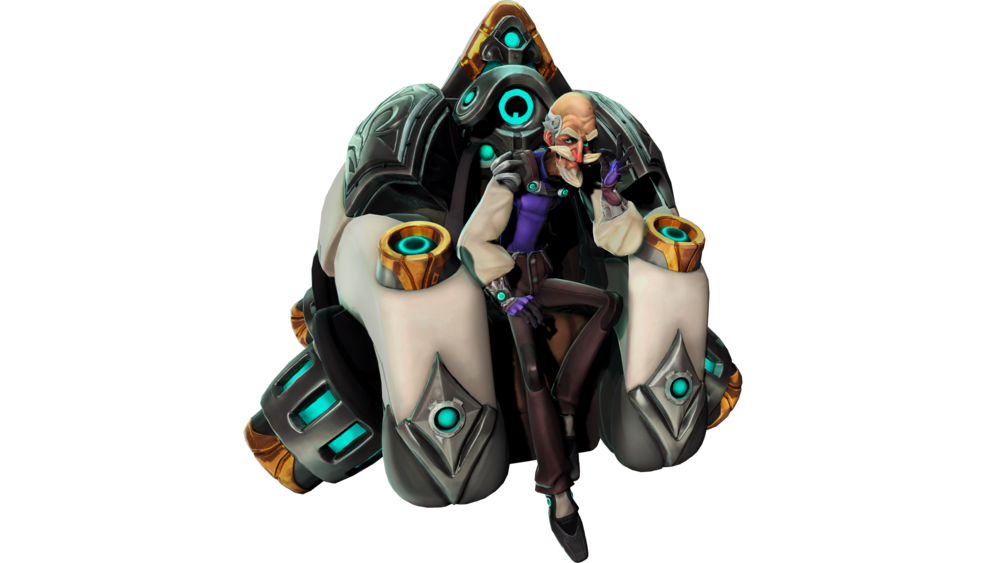
Phoebe (Attacker)
Biography: Counted among the LLC's greatest engineers, Phoebe Elizabeth Audelia Hemsworth IV utilizes powerful technology to move swiftly about the battlefield, and an array of five telekinetically-suspended swords to annihilate her foes. Full information on Phoebe's abilities, weapons, and talents can be found in-game or here.
How to Play Phoebe:
Phoebe is a melee assassin that's not quite as deadly as Rath at first, but in my opinion, begins to surpass him at later levels.
When playing Phoebe, you need to find a good balance between being cautious and not being afraid to get in the enemy's face. It's best to let your tanky team mate lead the charge, and while the enemy is distracted, you should Phasegate in and start poking the crap out of everyone. As long as an enemy Phoebe isn't getting focused, the fight isn't going to go your way. Miko is an especially good pairing with Phoebe, being able to pretty much heal her through anything while she kills everything in sight.
As Phoebe, you have a lot of built-in mobility. Your Phasegate can teleport you up ledges and away from fights, while your alternate attack does damage and propels you in whatever direction you choose. That alternate attack can really throw an enemy's aim off, especially in the heat of a battle. Be sure to use True Strike fairly consistently during fights, especially when your Helixes start making it even more beneficial.
Your melee combo has a total of four hits to it. Landing all four on a single enemy to activate your level one Helix shouldn't be too difficult, unless there's a substantial slow on you. Try not to cut off the melee combo with True Strike; it's best to get all the hits out you can before having a brief attack cooldown from that alternate attack. Keep in mind, True Strike can bring you forward enough so that an enemy that was previously out of range will take damage, and it can be used to attack enemies while fleeing. Think of yourself as a fencer, constantly jumping, dancing, and lunging around to throw enemies off-guard.
Phoebe's Blade Rush is one of the worst abilities in the entire game without Helixes. Four slow-moving, difficult to aim projectiles that deal around 40 damage each? It's not worth the time it takes to cast it. So it's important to throw a couple of Helixes into Blade Rush, so that Phoebe isn't essentially down an ability in comparison to everyone else. Aiming Blade Rush is a lot like Heroes like Thorn's basic attacks. You need to aim where your enemy is going, not where they are. Aiming will get easier with Helixes that make your Blade Rush rapiers explode on contact and such, but in general, take your time lining up a shot, but don't let your enemies kill you in the meantime.
Even though you have a sword rather than a gun, headshots are still critical hits, so don't be afraid to aim for those weak points. Phoebe can pretty easily wipe out mercenary camps, but she's not very good at attacking minion waves in Incursion. Minion waves leave you out in the open for everyone to see, and your melee attacks just aren't effective enough on them for the time you spend in the open to be worth it. The best thing Phoebe can do minion-wise is focusing down larger enemy minions and mercenaries, and maybe throwing an explosive Blade Rush on the crowds of minions.
Make sure to use Blade Cascade in chokepoints that force enemies to either take the really punishing damage, or to back off. And once that Ultimate is placed, dance around in it like a ballerina. If an enemy wants to attack you, make sure Blade Cascade punishes them for it. I've won 1v3 fights multiple times, simply because I forced enemies to fight me on my turf, AKA within the AoE of Blade Cascade.
Overall, Phoebe is a very good Hero when played correctly. Stay mobile, punish any enemy that gets near you, and don't get yourself in situations where you can be easily focused down. If you have a friend that likes to play Miko, have them build their Loadout around Sprint Speed and Healing Power, and stick them to you like a bandaid. A Phoebe/Miko combo is a force to be reckoned with in any mode, but especially modes where damage is king.
Helixes:
The following is a list of Helix choices that make Phoebe extremely deadly while still being able to escape and stay alive.
1. Preparation (Enemies hit by Blade Rush are marked. Marked enemies will be silenced for 3 seconds if you complete your melee combo on them). A 3-second silence at level 1 is extremely useful, and it remains useful the entire game. The movement speed from the alternate Helix is nice, but it doesn't compare to a 3-second silence.
2. Phase Distortion (Phasegate leaves behind a field that slows enemies. The field lasts 6 seconds). This Helix makes initiating with Phasegate on enemies hurt even more, and helps you escape with Phasegate; any enemies that keep chasing you are just going to be too slow to follow through.
3. Sharpened Blades (Your melee attacks deal 18% extra damage). The extra damage helps you massively, moreso than an extra shield/shield regen rate. (Having unlocked the Crosscut Mutation — if you have it, use it. The 150% extra damage, plus the little movement with your alternate attack throws enemies for a loop.)
4. Unintended Innovation (Your Blade Rush travels slower, and they explode on impact). In an odd way, this makes aiming your Blade Rush easier. Plus, the extra explosions apply your silencing mark on everyone in the area.
5. Passata Sotto (Landing a hit with True Strike increases your damage resistance by 30% for 3 seconds). This encourages you to keep moving around mid-fight with your True Strike, and lets you stay alive longer to deal more damage.
6. Disruptor Blades (Blade Rush penetrates 60% of enemy shields). Especially with the exploding blades, this Helix helps your Blade Rush soften up the enemy team before a fight, and opens any of them up for a 3 second silence.
7. Flurry (Increases your melee attack speed by 20%). Phoebe relies on getting damaging attacks out as quickly as possible. This Helix is extremely helpful, and a bit of a better option than increasing the damage of your skills by 15%.
8. Scientific Method (Significantly increases the casting range of Phasegate). This is a great Helix, making your Phasegate into a much more versatile and useful ability. The base range is so short, the ability feels somewhat useless sometimes.
9. Refined Techniques (The further Blade Rush travels, the more damage it deals, up to 100% additional damage). This is a far better option than the other Helix, which with the base shield and maximum shield, can only do up to 36 extra damage.
10. Calamitous Cascade (Enemies hurt by Blade Cascade take 16% extra damage from all sources). This Helix also makes enemies take additional damage from the Blade Cascade itself. Any enemy caught in your Ultimate now is going to have their health absolutely melt away, especially if any members of your team are present.
Loadout:
Phoebe is a character that has good mobility and even better damage. In my opinion, it's smart to prioritize Shield Penetration, Sprint Speed, and Attack Speed. Shield Penetration and Attack Speed let you melt through an enemy, which is Phoebe's job, and Sprint Speed lets you keep up with anyone, while also helping you chase down the inevitable runners.
How to Unlock Phoebe:
Achieve Command Rank 22 OR Kill 50 enemy players.
* * * * * *
Marquis (Attacker)
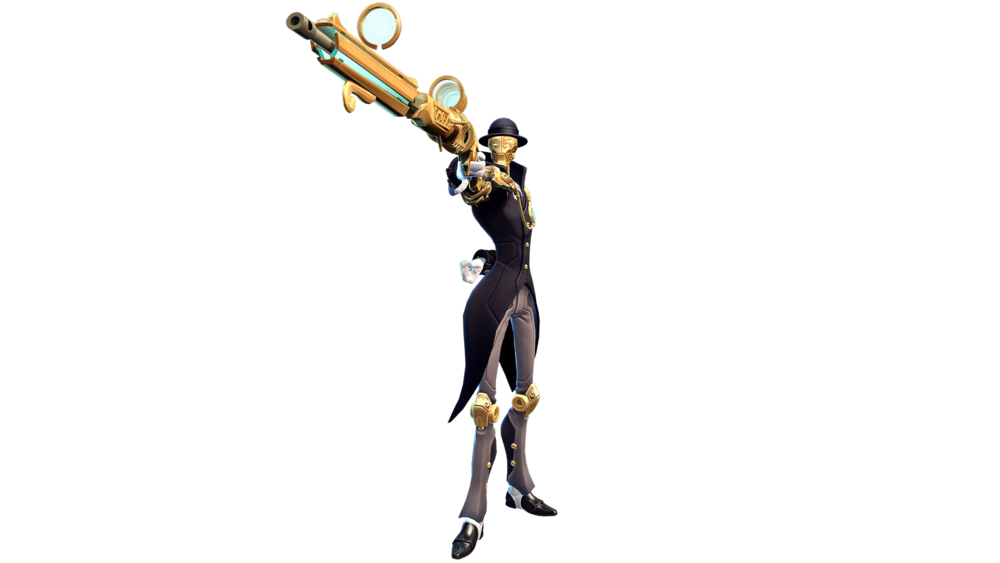
Biography: Class. Sophistication. Insanity. Formerly butler to Phoebe, Marquis d'Caliber was driven mad by a sudden loss of connection to the LLC's governing AI. Now, this high-society sociopath wreaks havoc on the unwashed masses in his endless pursuit of profit. Full information on Marquis' abilities, weapons, and talents can be found in-game or here.
How to Play Marquis:
As Marquis, you should always be firing your weapon.
Your sniper is one of the highest-damaging things in the entire game, and it's important to utilize that. Headshots on enemies are absolutely devastating, so always aim for the head (unless your goal is purely to continually trigger your passive). Don't be afraid to just aim for the body once you have the full 2-hit, quickshot passive Helix build. It's easier to miss when only aiming for the head, so continual body shots with passive triggers are far more effective.
Whenever you're being chased, throw an Owl in front of you, not behind; by the time the Owl has "charged up," the enemy will be where you were, and that's a free 133 damage hit. Additionally, don't be afraid to throw down Temporal Distortion right in front of you; given the right Helix choices, this'll speed you up, and slow down any enemies chasing you.
If your Predatory Strike is off cooldown, and you're at a high-traffic location, get it off cooldown. You're able to have 3 Owls on the map at any time; by the time you've thrown out your fourth, odds are, at least the first two have already exploded. Your Owls are a very nice, constant source of harassment on the enemy team, be sure to utilize that.
As Marquis, you're extremely fragile; at no point in time should you be at the front of the line. Be constantly firing your bullets at enemies' faces, but don't give them an opportunity to fire back. A skilled Marquis is one of the best assets any team can have. If your magazine doesn't have all of its bullets available, and there's no enemies nearby, be sure to reload. It's important to have everything you might need at your disposal.
Specifically on Incursion, Marquis can usually get a shot at the enemy Sentry from around the corner, and on Overgrowth, even from his own base. While it may seem foolhardy, an unskilled enemy team won't even notice you're there. And if they do catch on, throw down Temporal Distortion and book it out of there.
A good Marquis is a thing of nightmares. A bad Marquis is nothing more than waste of a Hero slot. If you can't aim your sniper, either practice your aim, or choose a different character; Marquis is a sniper above all else. And unlike Thorn, you don't need to aim where enemies are going. Aim where they are. You're using bullets, not arrows.
Helixes:
There's a lot of ways to effectively build Marquis, but this is the build I feel works best in PvP.
1. Waste Makes Haste (Your Temporal Distortion now additionally increases allies' movement speed by 30% for 4 seconds). Throwing down a Temporal Distortion in a teamfight will now heavily balance it in your favor. Throwing it in front of you will help even more as well; while you're sped up, any enemies chasing you will slow down.
2. Phaseflyer (Owls no longer collide with the world). This guarantees that your owls will either be killed or hit something. Better than them just being a shimmer that can hit a wall and die.
3. Executive Barrel Porting (Reduces Bindlebane's recoil by 60%). Massively helps you continually hit a target; the recoil difference is significant. One of the better Helixes for Marquis. (Having unlocked the Mutation Bullet Banker, I still stand for Executive Barrel Porting. More ammo in a clip is nice, but nowhere near as nice as 60% less recoil.)
4. Time Killer (Enemies inside Temporal Distortion now take 41 damage per second). This lets Temporal Distortion hurt minion waves considerably, and throwing it into a teamfight helps even more now. 41 damage doesn't sound like much, but it definitely helps.
5. Efficiency Expert (Your passive's bonus damage now triggers in 2 attacks on the same target instead of 3). While going with the alternate Helix would increase your passive's damage by 25%, being able to trigger the basic passive twice with 4 hits technically increases it by 100%. Being able to hit the same target 4 times shouldn't be too difficult with the recoil reduction from Executive Barrel Porting.
6. Your Decision. Either of these Helixes can work. It just depends on your playstyle; I personally prefer Distant Time, but that certainly isn't the only viable option. (Having unlocked the Mutation Parliamentary, My Dear!, I don't feel it compares to the extra range on either of these skills.)
7. Autoloader (Increases Bindlebane's Reload and Attack Speed by 25%). The quicker reload time is extremely noticeable, and being able to get more bullets out quicker allows you to trigger your 2-hit passive even faster.
8. Windfall (Upon detonation, Owls leave behind a field that deals 720 damage over 6 seconds). This Helix makes your Owls incredibly deadly. Throwing one into a pretty immobile teamfight can turn the tide extremely quickly; the 200-some damage from the explosion is nice, but the AoE that does 720 damage over 6 seconds is insane.
9. Cease and Desist (Further increases the enemy slowing of Temporal Distortion by 30%). This makes Temporal Distortion an absolute nightmare for enemies, and paired with the 41 damage per second from Time Killer, this ability becomes a thing of legend. The extra slow forces enemies to take damage for even longer.
10. Wallhax.exe (Bindleblast's shot can now go through world terrain, and enemy Battleborn are revealed in the scope). This makes your Ultimate something entirely unpredictable; you could hit an enemy from literally anywhere. Alternatively, in Incursion mode, allow minions to take down a Sentry's shield, then get a free 375 damage on it from your base. The longer travel time will make the shot deal massive damage.
Loadouts:
Marquis is the most gentlemanly and psychopathic robot sniper I've ever come across, and as such, I think he deserves a good Loadout. In my opinion, it's best to prioritize Reload Speed, Attack Speed, and Shield Penetration. Reload Speed lets you get bullets flying towards the enemy team more consistently, allowing your passive to activate even more. Attack Speed does the same thing. Meanwhile, Shield Penetration lets you punish anyone that thinks they're safe with 50 health and and an 800 shield. A sniper with Shield Penetration is nothing short of terrifying.
How to Unlock Marquis:
Starter Character.
* * * * * *
El Dragón (Attacker)
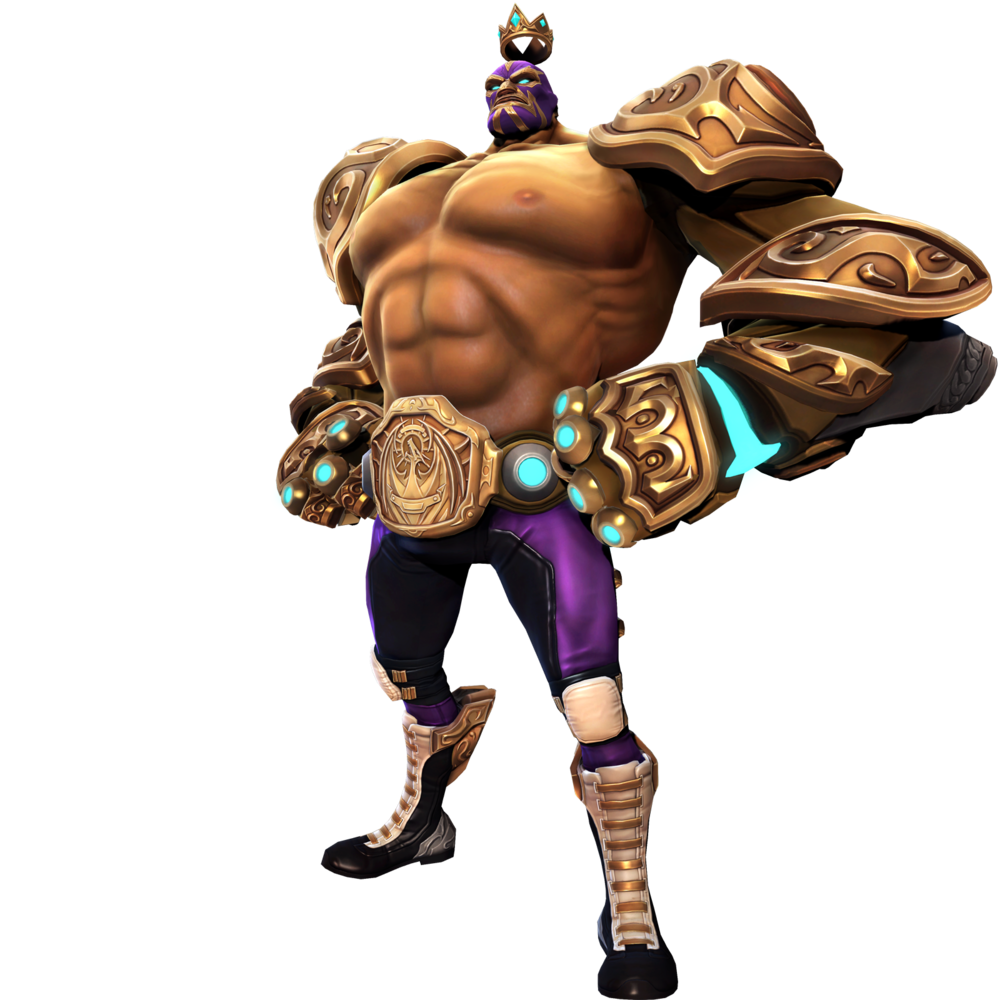
Biography: Francesco Drake ruled the LLC's professional wrestling circuit as El Dragón until his last match, when the renegade magnus ISIC claimed his title… and his arms. Fit with cybernetic replacements, El Dragón now fights for the Battleborn, patiently awaiting a rematch against his greatest foe. Full information on El Dragón's abilities, weapons, and talents can be found in-game or here.
How to Play El Dragón:
Like a tank, El Dragón excels at messing with the enemies' positioning in every single fight with a plethora of crowd control, but like an attacker, he deals amazing damage while doing so. So he's pretty fun.
While you are a gigantic beefy wrestler, like most wrestlers, El Dragón's macho damage-sponge appearance is completely fabricated. So while it might feel like a jolly good idea to Clothesline into the enemy team and punch Miko's stupid mushroom cap face, it'd probably be best to hold off until your team joins you in that respectable endeavor.
For an Attacker, El Dragón has some very nice crowd control, along with insanely useful debuffs, provided his Helixes are built correctly. I go over all of that in the Helix section, though; all you need to know here is the following beautiful combo: Dropkick an enemy to make them take increased damage, instantly cancel a Clothesline in their face to knock them up, and while they're still falling, activate En Fuego for explosive damage, and unleash a flurry of punches into their poor body. If they still have enough health to fight back, Dragon Splash them into the ground so they deal less damage (plus, with En Fuego, Dragon Splash will stun them). Sound unfair and awesome? That's because it is.
El Dragón's primary objective is to pretty much render the enemy team useless. Focus down effective healers like Miko, reduce the damage of any dangerous attackers with Dragon Splash, open up overextending enemies to extra damage with Dropkick before knocking them upwards with a Flailing Fist Clothesline. El Dragón isn't exactly a character that adapts; he doesn't need to. The sheer amount of heartache a good El Dragón puts the enemy through is like three high school breakups condensed in the form of one meaty punch (thanks Power Fist!).
Don't be afraid to use En Fuego to deal damage when you're surrounded by enemies; if you're going to die, you may as well die with a literal bang of fire and death. With that said, though, in a lot of situations, Clothesline can easily get you to safety. The skill lasts a long time, deals decent damage, and is so annoying to the enemy that they might just give up on the chase because they can't bear to look at you anymore.
If at all possible, preserve your normal abilities for their En Fuego counterparts. The boosts from your Ultimate on your skills is substantial; Clothesline turns into a leap that deals massive damage to a single enemy, and Dragon Splash stuns everyone caught in its radius. And though it's not connected to your skills being boosted, it's still worth mentioning: your basic attacks after using En Fuego are absolutely devastating. Don't waste your time with the fireball from the level 10 Helix, your punches do just fine on their own.
I'll leave you with one last bit of advice. El Dragón is an –>attacker<– that debuffs, knocks up, and stuns his enemies… Play him like one. In other words, go induce more rage and saltiness than a Smash Bros. tournament held on the shore of the Dead Sea.
Helixes:
The following are the Helixes I used when playing this champion wrestler. This build is meant to give you annoying crowd control to use on the enemy while making your skills as deadly as they can be.
1. The Comeback (Enemies hit by Dragon Splash deal 30% less damage for 8 seconds). Not only is 30% less damage extremely substantial, this debuff lasts for eight seconds, easily making this one of the best Helix choices available. The alternate Helix boasts a 3-second, 30% slow on enemies hit with Clothesline, which sounds nice, but becomes useless when we get Flailing Fists later.
2. Momentum (For each enemy hit by Dragon Splash, the cooldown is reduced by 10% and your movement speed is increased by 10%). This not only lets you use your damage-reducing ability much more frequently, it also keeps you nipping at any enemy's heels with the very good movement speed. In Incursion, simply Dragon Splashing into a minion wave will give you such a massive speed boost, it'll give Sonic a run for his money. I'm so very sorry for that joke.
3. Power Fist (Replaces the last attack in your combo with a single-target, powerful punch). This makes the last attack of your combo extremely damaging for a basic attack. It only gets worse for the enemy if it's a critical hit.
4. Flailing Fists (De-activating Clothesline mid-run knocks nearby enemies into the air). One of El Dragón's best Helixes, this gives you extremely good crowd control that gives you time to activate your Ultimate wiith minimal annoyances attacking you in the meantime. This turns Clothesline from an okay damaging ability to essentially a death sentence.
5. Heavyweight (For each Undisputed Champion stack, you now additionally take 3% less damage [up to 30% at 10 stacks]). If not just for the amazing potential of 30% reduced damage all the time — actually, just for that. 30% reduced damage. Add that to the 30% less damage given from enemies who are hit with your Dragon Splash, and you're essentially shutting down every single damage dealer on the enemy team. Just wipe out some enemy minions until you get 10 stacks, then watch the kills roll on in.
6. Hang Time (Dragon Splash causes your shields to begin recharging, and your health regeneration is increased by 84 for 4 seconds). Essentially a heal of 336, added to a bit of shield recharged before someone inevitably stops it, and you've got yourself a stew, baby. Jokes aside, this Helix is a nice little addition to your "things that keep me alive" collection, which on El Dragón, isn't a very expansive collection.
7. Big Splash (Increases Dragon Splash's area of effect by 50%). Let's be clear, aiming Dragon Splash isn't easy. Most enemies will realize what you're up to and move out of the way by the time you've landed. Increasing the area of effect lets you hit more targets at once to move faster and net you a shorter cooldown, while also getting even more enemies to deal reduced damage. For eight seconds. Did I mention how crazy useful eight seconds of reduced damage is? Because it is.
8. Attitude Adjustment (Enemies hit by Dropkick take 16% increased damage from all sources for 8 seconds). Holy crap. A previously useless attack, Dropkick, now turns enemies into putty in your hands. Just bop an enemy with a quick dropkick, Dragon Splash their face, knock them in the air with a prematurely ended Clothesline, and lay waste to their dignity.
9. Cut the Line (Each target hit by Clothesline reduces the cooldown by 10%). Use Clothesline correctly, and you'll now have constant knock-ups and charges at your disposal. Just make sure to hit two or three targets in one Clothesline, and you're set.
10. Title Fight (En Fuego creates a ring of fire where you cast it, dealing 133 damage to enemies when they enter or exit). Your already brutal Ultimate now essentially closes off the area you used it in to any enemy that wants to stay alive. While the ones behind on their mortgage payments won't be so cautious, you can rest assured that most enemies will avoid a scorching ring of fire.
Loadouts:
It's my opinion that El Dragón has amazing built-in damage. To add any extra is entirely unnecessary. It's best to simply focus building structures to net you some extra experience. El Dragón is a Hero that gets significantly stronger with each level, and it shows. I would prioritize Shield Penetration, Reduced Building Costs, and Damage Reduction. Shield Penetration to help you in your totally not faked WWE-style combat. The Reduced Building Costs let you build more with less shards, thus netting you more experience (and earlier levels) with ease. And finally, Damage Reduction helps you stay alive longer in combat, and pairs beautifully with the potential 30% damage reduction from the Heavyweight Helix at level 5.
How to Unlock El Dragón:
Achieve Command Rank 20 OR Win 5 matches as an LLC Hero.
* * * * * *
Kleese (Supporter)
Biography: Following his dismissal as director of Minion Robotics, the cantankerous Kleese now serves as Nova's chief science officer and mad-scientist-in-residence. Abhors away missions but relishes opportunities to test his tech, such as his "Battle Throne". Full information on Kleese's abilities, weapons, and talents can be found in-game or here.
How to Play Kleese:
Kleese is one of the most tactical characters available in Battleborn, which means a lot in a game mostly about firing guns and swinging blades wildly.
You can move around in the air a lot better than even Benedict can, in some ways. Because of your Battle Throne, you're a pretty large target, so it's important to keep moving to not give your opponents a free kill. Hide around corners where you set up your Rift networks so that your team has a miniature base of operations. Or even better, set up your Rift network on a point in Capture mode, and essentially guarantee every team fight over that point.
Much like Reyna, your alternate attack is very good at melting away enemy shields, so be sure to use it in lieu of your primary attack if an enemy's shields are up. Especially use it against the Sentries in Incursion; the damage is very significant.
You should primarily use your Energy Mortar to either defend your Rift network and punish over-zealous enemies, or to shut down certain areas of the map from safe enemy movement. And much like Miko's Fungus Among Us ability, be sure to place Rifts where an enemy Marquis can't easily snipe them down. They should be as far out of enemy line of sight as possible without sacrificing their usefulness. A network of Rifts is a legitimately scary thing for an enemy to go up against, so they're going to want to kill them as soon as possible. It's your job to defend them as best you can, but you also need to know when it's a lost cause, and when it's time to retreat. Besides, it's better for the enemy to kill your Energy Rifts instead of your minion wave or Varelsi scouts.
Not everyone fully understands every character, so be sure to inform your team of how useful sticking in your Rift network is to them, and how at Helix 5, they'll be healed just by being around you. If they don't know about your support capability, they might not ever utilize it. At that point, why bother with a Supporter?
In conclusion, Kleese is a pretty badass Supporter. It's your job to essentially claim territory for your team with Rifts, but not to be over-zealous in doing so. If you over-extend without your team mates, your Rift network will be destroyed, and more than likely, you'll die along with it. Claim the territory at times when it'll be the biggest issue for the enemy team to deal with it, and shut down any enemies that get in your way.
Helixes:
These are the Helixes I found the most beneficial in my games with Kleese. In my opinion, he's one of the most tactical characters available, thanks to his Energy Rifts, so it's important to build him based on that.
1. Shocking Pulse (Energy Rifts shock nearby enemies. Deals 50% bonus damage to shields). This builds some natural defense in to your most important ability. Melee enemies will have a hard time attacking your Rifts now.
2. Shiftless Shells (Energy Mortars now slow enemies for 3 seconds). Your Energy Mortars now pretty much nullify enemy shields, then slow them down for 3 seconds, making them even easier targets than before. What's not to like?
3. Don't Tase Me Bro (Your Shock Taser now arcs to 1 additional enemy). Though I'm sure this is an unpopular opinion, I heavily prefer this Helix. Chair energy is very important for Kleese, who's such a massive target. It lets you stay mobile, dodging a fair amount of enemy attacks. So the alternate Helix depleting all of it is just kind of a turn-off. Plus, you get to melt two shields at once now!
4. Rift Network (Energy Rifts now gain in power when near each other, their output being increased times the number of Rifts in the network). Kleese's most important Helix by far. You can now essentially claim an entire area for you and a couple of allies, as the Rifts will heal their shields massively just for being there (83 per second with one Rift, up to 332 per second with four. [See Helix 6]). Plus, that's up to 332 damage a second to nearby enemies just for being there, not to mention the great damage from your level 1 Helix.
5. Don't Call It a Heal Chair (Kleese now heals nearby allies 120 per second). And suddenly, Kleese is one of the best Supporters in the entire game. That was quick.
6. Bulk Savings (Allows for 1 additional Rift at a time, up to 4). You get an extra Rift for your overpowered network!
7. Tampered Mortars (All Energy Mortars now land at the same time, blanketing an area). Beautiful explosions abound! Every individual mortar's shield damage and slow is now guaranteed to any enemy caught in the blast.
8. Brains Before Brawn (Increases Kleese's shield). With the already increasing shield per level from your passive, this Helix just makes your shield an insanely annoying obstacle for enemies.
9. Quick Pulse (Reduces Rift pulse charge-time by 1 second). Your Rift network now hurts enemies and heals allies' shields every 2 seconds instead of every 3. You're just getting scary now.
10. Sharing is Caring (When Black Hole expires, all team mates within its radius receive 225 Overshield). Gives your very offensive Ultimate some nice support added on to it. Most melee Attackers on your team are gonna dive into your Black Hole anyway, so this is a great way to help them out once they lose that initial advantage.
Loadout:
Kleese is a very unique character, so getting his Loadout right is a bit difficult. In my opinion though, it's best to play to your strengths, and one of Kleese's strengths is his naturally huge Shield. I like to get less Shield Recharge Delay, plus Shield Regen Rate. This helps his huge shield pool fill up much more efficiently than it would otherwise. In addition to those two, I think it's good to get either Shard Generation for additional map control with build nodes, plus faster levels, or Cooldown Reduction to get those Rift networks set up quicker.
How to Unlock Kleese:
Achieve Command Rank 36 OR Earn a Silver Rating on all Story Missions.
* * * * * *
ISIC (Defender)
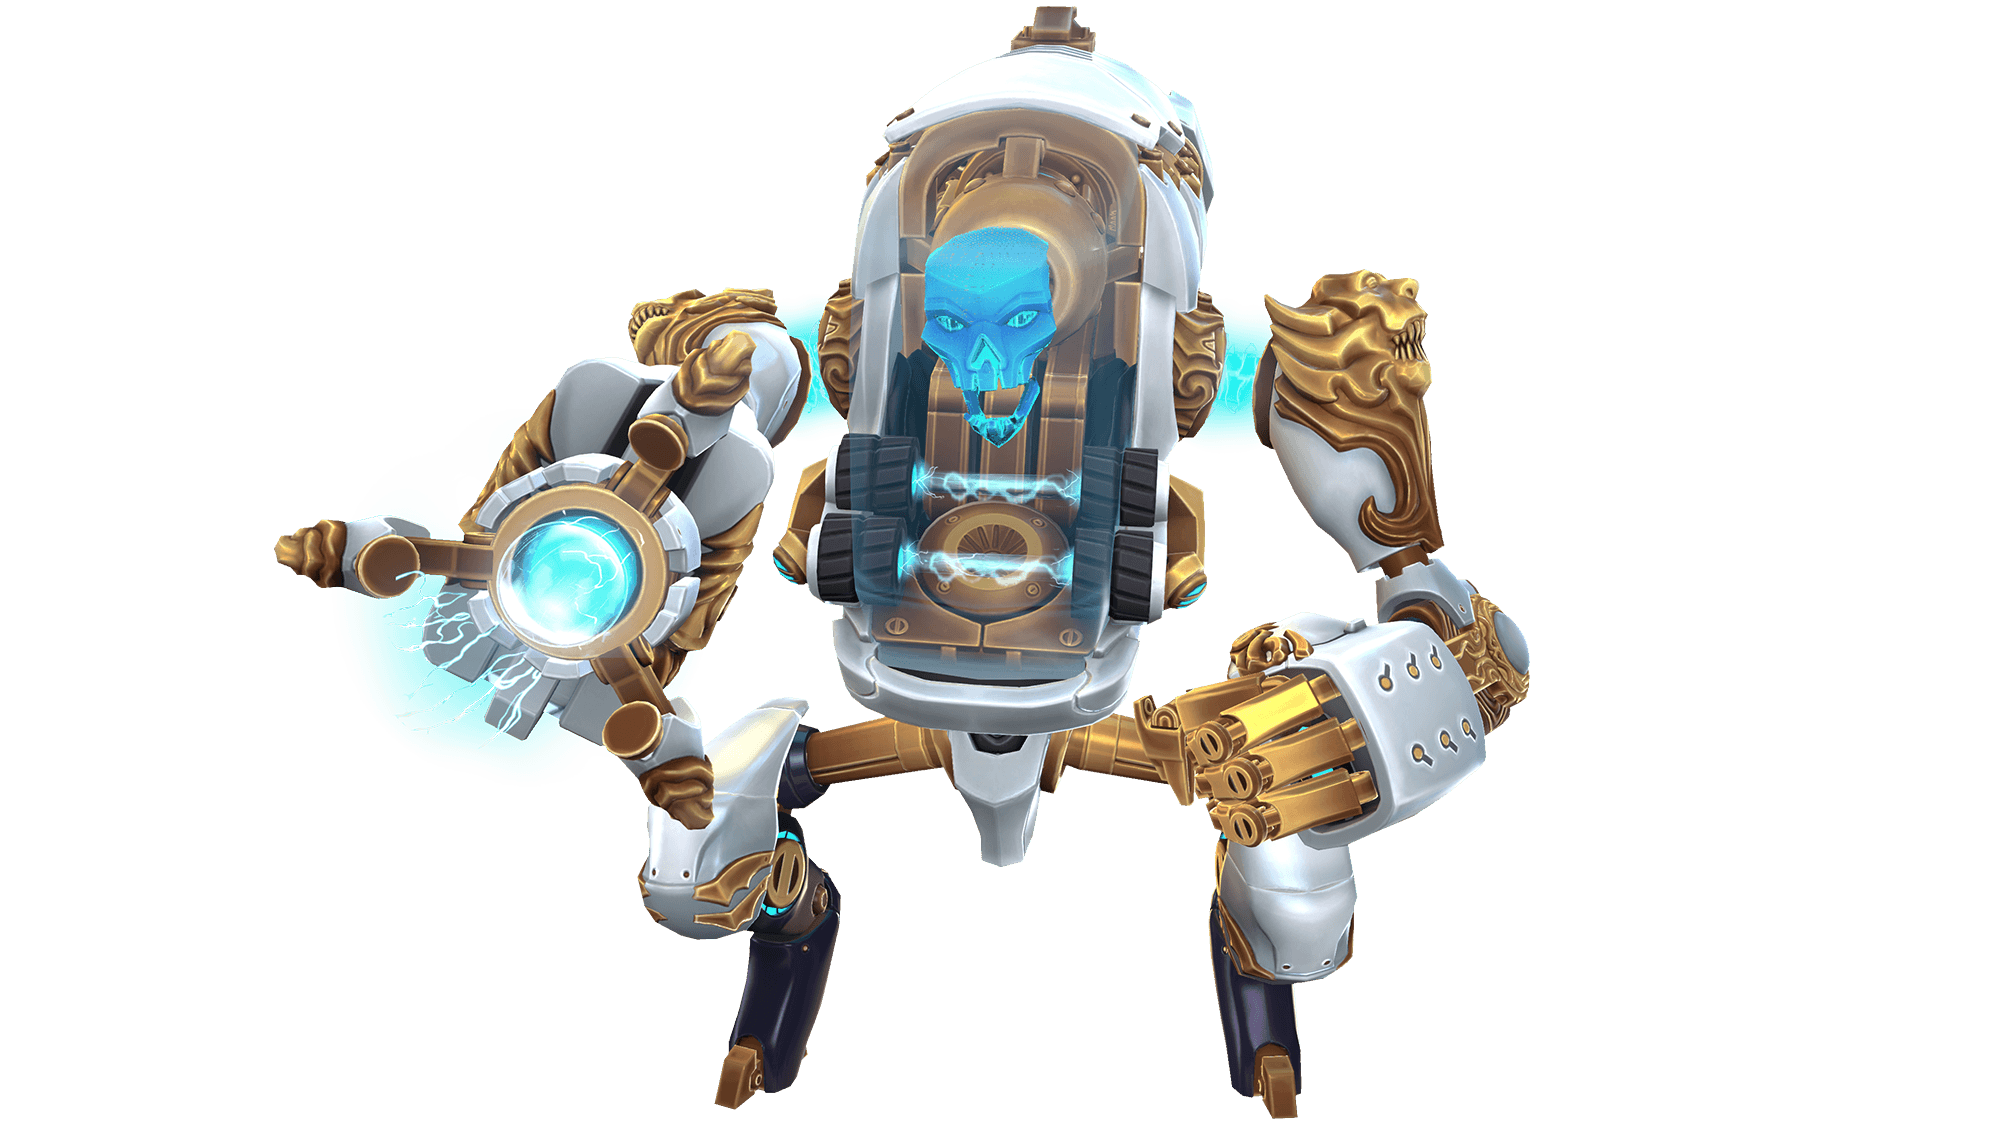
Biography: Once the lead manufacturing Magnus of Minion Robotics, ISIC abandoned his post to crash reality itself through the application of unthinkably complex code. Though debugged by Kleese, this Magnus is still regarded as among the most nihilistic and terrifying of the Battleborn. Full information on ISIC's abilities, weapons, and talents can be found in-game or here.
How to Play ISIC:
The best part of playing ISIC is the voice actor. Probably one of the most fun and effective tanks in the game, ISIC is like a damage sponge that never takes any damage.
First off, yes, his alternate attack is a built-in shield, but most of the time, you shouldn't bother with it. Only use the shield when being sniped at, or when you're low health, and just stalling against an enemy that an ally is killing. His real shield lies in his first ability, Rotating Wards. There should never be a reason to not cast these Overcharged. It lets them take more damage, thus giving you more time to kill whoever has the nerve to try to kill you.
Since I was personally unable to find any guide as to how ISIC's overcharging works, I'll put it here. Holding your attack button fires little balls of plasma, and this charges up your weapon. Letting go of the attack button once it's Overcharged shoots a large ball of high-damaging plasma. To Overcharge your abilities, just use them while you're still holding down the attack button. The Overcharge graphic may go away, but this does apply it. Unless you're in a tight spot, you should always be casting your abilities as Overcharged; it's free damage.
Treat the Overcharged basic attack as your primary method of damage. It doesn't matter if you're shooting the wall before peeking around the corner; so long as that last shot hits an enemy, you've done enough damage for one hit.
If you're feeling brave, and you're alone with a ranged enemy, walk closer to them with your Rotating Wards active; the ricochets will have a bigger chance of firing back at them. ISIC can technically melee, but this should only be used as a way to knock enemies backwards, and sparingly; its damage is insignificant.
Don't be afraid of Plasma Dashing into an enemy that's close to other enemies, so long as you have allies nearby. Once your Plasma Dash stuns, it'll start guaranteeing kills for any snipers or assassins that are nearby. A Marquis with attack speed and the 2-hit passive Helix can easily snipe down any enemy you stun, without headshots. This goes double if you chose the 60% shield penetration on Plasma Dash Helix.
For a tank, ISIC has awesome damage output. But hurting enemies should only be half of your focus; Rotating Wards can sometimes be even better damage output than your other attacks, simply because of the ricochet. Make sure your health is protected first and foremost before you start chasing enemies. This doesn't exactly apply in teamfights, though; don't abandon your team because you're afraid of death. As a tank, your job is to soak damage and dish it out equally.
And finally, make sure to activate an Overcharged Rotating Wards, before activating your Ultimate (which should be Overcharged as well. This gives an awesome Overshield that enemies need to eat through after they've already gotten through your ricocheting wards). This will give you good protection from enemies as you hold down both attack buttons and unleash death upon them. This Ultimate is insanely good at killing everything. As long as you're aiming well, your targets will die.
Helixes:
The following is how I believe ISIC's Helix list should be built. This is meant to make him more tanky, and just straight-up deadly to be around.
1. Crushin' Those Shields! 😀 (60% of Plasma Dash's damage penetrates enemy shields). The alternative just isn't that good, but this also comes in handy later when you get the Helix that makes Plasma Dash stun. Any enemy hit with Plasma Dash will be stunned for 2 seconds, and already have a sizeable chunk of their health missing.
2. You Dropped These! 😉 (Rotating Wards cause enemy fire to ricochet). By far one of the best Helixes in the game. Not only will your Rotating Wards protect you from damage, but now they'll also punish any enemy trigger-happy enough to keep firing on your shields. This is a must-have.
3. Charging on the Go! 😀 (Charging ISIC's plasma cannon no longer slows movement speed). This keeps you mobile, and a mobile target is the hardest kind of target to hit. This also lets you charge your really good attacks while chasing enemies without falling behind. Similarly, use it while running away; you're not slowed, so you may as well punish anyone that chases you.
4. Hold It Right There! }:O (Plasma Dash now stuns enemies for 2 seconds). Not only does this make an "ehhh" ability a great one, it leaves enemies that you hit wide open for attack, especially after the 60% shield penetration softened them up for you.
5. In a Big Rush! O_o (ISIC now moves 50% faster while Overcharged). This not only means you're not slowed by charging your attacks, you're actually benefiting from always having a charge available. Sure, you won't be able to sneak up on anyone if you're constantly attacking, but you'll always have a free 300 damage ready to fire. Plus, just having 50% extra movement speed is insanely useful, especially for chasing/escaping.
6. Burlier Wards! 😀 (Lets Rotating Wards soak 225 more damage each before being destroyed). More ward health means more ricocheting and more protection. Very useful.
7. Quick Charge! 😀 (Decreases the amount of time it takes for ISIC to charge his attacks by 25%). This lets you get your movement speed boost sooner, and lets you unleash more frequent extra-damaging balls of energy. Need I say more?
8. Hard Workin' Wards! 🙂 (Increases lifetime of Rotating Wards by 6 seconds). This Helix means that even if enemies wise up and stop shooting at your wards, knowing it'll ricochet, they still need to take a lot of damage from you just from your basic attacks while you're essentially invincible.
9. Your Decision. Both of these are good options. If enemies have a tendency to bunch up together, then go with Dodge This! O.O for the extra AOE. Otherwise, choose Can't Run From Me! O.O for the extra speed (landing the stun is easier) and range (makes it harder for enemies to run away).
10. Shields Up! 😀 (Activating Omega Strike deploys Energy Aegis to block damage from the front. If Energy Aegis is destroyed, it will respawn in 6 seconds. Blocks 2000 damage). This is a must-have. The extra damage from the alternate Helix sounds nice, but blocking 2000 damage from the front while being the ultimate killing machine that is "Omega Strike mode," is far better. Killing you will be a chore, especially while you're barraging your enemies with plasma and bullets.
Loadouts:
ISIC is a rather complex character, so a lot of people are going to have a lot of different ideas on how his Loadouts should be built. In my opinion, though, his kit has such naturally good defense and offense, the best things to prioritize are Cooldown Reduction, Health, and Damage Reduction. CDR will let you use your best ability, Rotating Wards, more frequently, along with your Plasma Dash's nice 2 second stun. Health's purpose is obvious; ISIC especially will benefit from it, as the longer you're alive, the more time you'll have to re-use Rotating Wards. And finally, Damage Reduction: Once enemies break through your Rotating Wards, you're going to feel naked. You don't want to take too much damage out of nowhere, so preventing some of it definitely helps in the long run.
How to Unlock ISIC:
Achieve Command Rank 30 OR Complete "The Algorithm" Story Mission. The story mission is far easier; it's the very first mission after the Prologue.